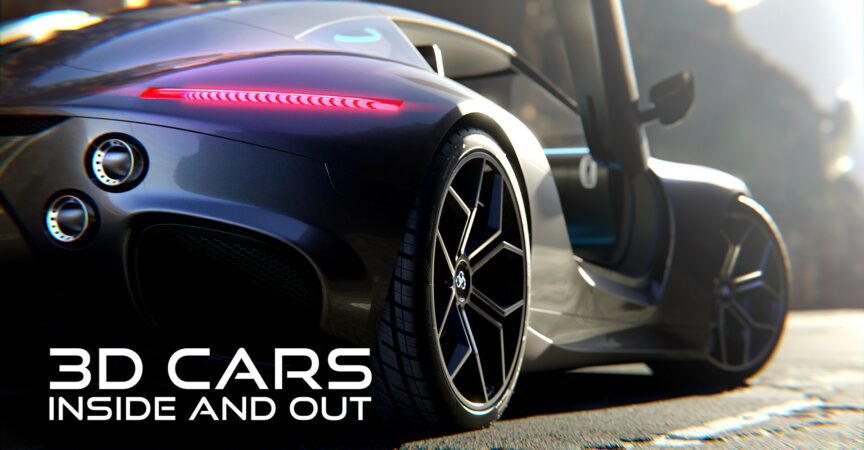
3D Cars – Inside and Out by Chris Plush by Chris Plush from CGMasters (Complete)
Release date:2023
Duration:23 h 59 m
Author:Chris Plush
Skill level:Beginner
Language:English
Exercise files:Yes
Here we go again, but this time, the course is more extensive and better, and there’s a lot of new stuff, including an entire interior. My past car modeling training has been studied by designers from industry giants like Hyundai, Volvo, and Ford, as well as from top gaming and film companies worldwide. And now I’ve taken those techniques and made them even better. This step-by-step course will tackle a fantastic car design by professional designer Lee Rosario. I’ll show you new ways to quickly solve even the trickiest hard surface challenges as we build this extraordinary car together from the first vertex to the final renders.
So join me in this car creation journey and learn tons of hard surface modeling, shading, rendering, and compositing techniques inside the free, open-source 3D software Blender.
Section 01 – Introduction
01 – Welcome to Class
02 – Getting Started
Section 02 – Preparing for Class
01 – Essential Preference Changes
02 – Recommended Preference Changes
03 – Custom Matcaps
04 – Full Guide to the Guide Mesh – Essentials
05 – Full Guide to the Guide Mesh – Tips and Tricks
06 – Full Guide to the Guide Mesh – Whats New
Section 03 – Modeling – Exterior – Guide Meshes
01 – Setting Up Blueprints
02 – Hood Area Contours
03 – Wheel Well Contours
04 – Front Bumper Contours
05 – Grill Contours
06 – Front of the Front Fender
07 – Front Bumper
08 – Hood Area
09 – Back of the Front Fender
10 – Control Loops – Hood
11 – Front Bumper Vent
12 – Side Rail
13 – Door Area
14 – Trunk Area Contours
15 – Trunk Area
16 – Back Fender
17 – Control Loops – Door Area
18 – Back Bumper
19 – Back Vents
20 – License Plate Area
21 – Roof
22 – Windows
23 – Final Touches
24 – Splitting it Apart
Section 04 – Modeling – Exterior – Final Panels
01 – Hood
02 – Front End and Fenders
03 – Front End Vents
04 – Headlight Panels
05 – Front Bumper
06 – Side Slope Panels
07 – Side Bottom Rails
08 – Side Doors
09 – Door Handles
10 – Back Fenders
11 – Back End
12 – Back Bumper
13 – Back Bumper Cutouts
14 – Back Blinker Panel
15 – Trunk
16 – Roof
17 – Door Tops
18 – Adding Thickness
Section 05 – Modeling – Exterior – Windows
01 – Windshield
02 – Door Glass
03 – Quarter Glass
04 – Top Glass
Section 06 – Modeling – Exterior – Plastics
01 – Body Kit – Bottom – Front
02 – Body Kit – Bottom – Back
03 – Body Kit – Bottom – Final Touches
04 – Body Kit – Floating Panel
05 – Body Kit – Ribs
06 – Wheel Wells
07 – Front Side Vent
08 – Back Side Vent
09 – Front Bumper Vent
10 – Hood Vent
11 – Trunk Vent
12 – Fuel Inset
13 – Roof Trim
14 – Windshield Gutter
Section 07 – Modeling – Exterior – Side View Mirror
01 – Housing
02 – Insert
03 – Mirror
04 – Arm
Section 08 – Modeling – Exterior – Front Grill
01 – Border
02 – Grill
03 – Ring Housing
04 – Rings
Section 09 – Modeling – Exterior – Back Grill
Section 10 – Modeling – Exterior – License Plate Area
01 – Plastic Trim
02 – Light Box
03 – License Plate
Section 11 – Modeling – Exterior – Boosters
Section 12 – Modeling – Exterior – Headlights
01 – Housing
02 – Buttons
03 – Main Light
04 – Loop Lights
05 – Backplate
06 – Lens
Section 13 – Modeling – Exterior – Tail Lights
01 – Housing
02 – Light
03 – Lens
Section 14 – Modeling – Exterior – Blinkers
01 – Lens
02 – Housing
03 – Light
Section 15 – Modeling – Exterior – Windshield Wipers
01 – Long Arm
02 – Short Arm
03 – Housing
04 – Blade
05 – Bolts
Section 16 – Modeling – Exterior – Other Details
01 – Logo – H6
02 – Logo – Rings
03 – Logo – Julietta
04 – Fuel Area Insert
05 – Gas Cap
06 – Rubber Seals
07 – Hexagon Meshes
08 – Shadow Meshes
Section 17 – Modeling – Exterior – Wheels
01 – Rims
02 – Center Cap
03 – Tires
04 – Tires – Final Touches
05 – Hub
06 – Nuts and Bolts
07 – Brake Disc
08 – Brake Caliper
09 – Brake Caliper Details
10 – Air Stem
11 – Vent Spews
12 – Shocks
13 – Basic Wheel Rig
14 – All Other Wheels
15 – Finishing the Rig
16 – Final Touches
Section 18 – Modeling – Interior – Doors
01 – Door Shell – Part 1
02 – Door Shell – Part 2
03 – Side Panel
04 – Side Panel – Light Strip
05 – Speaker
06 – Latch
07 – Side Pocket
08 – Handle
09 – Final Touches
Section 19 – Modeling – Interior – Full Shell
01 – Side Shell
02 – Front End Shell
03 – Dashboard Shell
04 – Middle Console Shell
05 – Dashboard Column
06 – Middle Console Column
07 – Engine Shell – Part 1
08 – Engine Shell – Part 2
09 – Engine Platform
10 – Roof Shell
11 – Front Roof Supports
12 – Back Roof Supports
13 – Final Touches
Section 20 – Modeling – Interior – Dashboard
01 – Adding Extra Geometry
02 – Vent Cutouts
03 – Vent Border
04 – Vent Blades
05 – Vent Hex Meshes
06 – Gauge Cutout
07 – Gauge Border
08 – Gauge Housing
09 – Gauge Screen
10 – Gauge Glass
11 – Air Bag
12 – Glove Compartment
13 – Final Touches
Section 21 – Modeling – Interior – Steering
01 – Steering Column
02 – Steering Column Cutout
03 – Steering Wheel Hub – Part 1
04 – Steering Wheel Hub – Part 2
05 – Airbag
06 – Steering Wheel Handle – Part 1
07 – Steering Wheel Handle – Part 2
08 – Steering Wheel Pads
09 – Steering Wheel Light Strip
10 – Buttons – Part 1
11 – Buttons – Part 2
12 – Paddles
13 – Final Touches
Section 22 – Modeling – Interior – Middle Console
01 – Screen Cutout
02 – Screen Housing and Screen
03 – Screen Cover
04 – Dial Cutout
05 – Dial Housing
06 – Dial
07 – Middle Compartment Cutout
08 – Middle Compartment Panel
Section 23 – Modeling – Interior – Chairs
01 – Basic Shape
02 – Main Shell
03 – Back Cushion
04 – Head Cushion
05 – Head Cushion Logo
06 – Bottom Cushions
07 – Base
Section 24 – Modeling – Interior – Seatbelts
01 – Retractor
02 – Webbing
03 – Latch
Section 25 – Modeling – Interior – Engine Cover
01 – Platform Cutout
02 – Main Shell
03 – Side Inserts
04 – Logos
05 – Middle Insert
06 – Light Strips
07 – Border
08 – Final Touches
Section 26 – Modeling – Interior – Floor Mats
01 – Front Mats
02 – Front Mats – Logos
03 – Back Mat
Section 27 – Modeling – Interior – Pedals
01 – Brake Pedal
02 – Gas Pedal
03 – Foot Rest
Section 28 – Modeling – Interior – Other Details
01 – Seals – Roof
02 – Seals – Door
03 – Light Strips – Roof
04 – Light Strips – Lower Shell
05 – Light Strips – Upper Shell
06 – Windshield Border
07 – Quarter Window Border
Section 29 – Modeling – Interior – Door Hinges
01 – Basic Door Rig
02 – Door Hinges
03 – Door Frame Slot
04 – Door Plate
Section 30 – Rendering – Shaders – Setup and Basic Shaders
01 – Preview Lighting
02 – Basic Shaders Overview
03 – Applying Basic Shaders
Section 31 – Rendering – Shaders – Complex Shaders
01 – Car Paint – Red
02 – Car Paint – Black
03 – Car Paint – Silver
04 – Car Paint – Blue
05 – Carbon Fiber
06 – Applying Carbon Fiber
07 – Brake Disc
08 – Tire UV Map
09 – Tire Shaders
10 – Leather – Black
11 – Leather – Black – Rough
12 – Leather – White
13 – Leather – White – Rough
14 – Floor
15 – Floor Mats
16 – Seatbelt
17 – Dial Buttons
18 – Steering Buttons
19 – Gauge Display
20 – Console Display
21 – Hex Mesh
Section 32 – Rendering – Setup
01 – Render Settings
02 – Final Model Review
03 – Environment Overview
04 – Appending the Environments
Section 33 – Rendering – Mountain View – Back
01 – Final Render
02 – Post Processing
Section 34 – Rendering – Mountain View – Front
01 – Final Render
02 – Post Processing
Section 35 – Rendering – Mountain View – Interior
Section 36 – Rendering – Venice Sunset
01 – Final Render
02 – Post Processing
Section 37 – Rendering – City Street
01 – Final Render
02 – Post Processing
[CGMasters] 3D Cars – Inside and Out by Chris Plush.7z
[CGMasters] 3D Cars – Inside and Out by Chris Plush_Subtitles (2).7z
[CGMasters] 3D Cars – Inside and Out by Lee Rosario_Subtitles.7z



 Channel



wow, thanks for this course
I love you online courses club admin/admins
you are amazing
Gpay or any UPI Payment not working for Premium access.kindly make it possible too.
https://t.me/online_courses_club_india
Hi, It’s seem like the project files(blue prints) is missing. If anyone got it could you share with us. Thanks you
Thank you but there is chapters 24 to 37 were added, could you please add to rest of chapters ?
The rest of the class is complete. Can you update the rest of the part? Thank you!
Thank you for sharing!!can the rendering part of this course be added to it, I need them very much!
Missing one video:
Section 28 – Modeling – Interior – Other Details
6. Light Strips – Door
The Project files seems to be missing, which is needed to do the rendering lessons, can you pls add?
The Project Files are missing, could you please add them? Thank you!
Where are the course files and resources loacated ?
Project files are missing and required to do rendering lessons could you please add them? Thanks.
Project files please
Can’t find the project files, can you please upload it?
project files with the textures are not here please add them
thank you so much , but the project files is missing
https://www.filemail.com/d/ozmwloefkdwulgi
I found the files on another web, I dont know if these are complete.
Does anyone have the project files? They are vital for the course. Admin, kindly upload ASAP.
Thank you for this course
But the resources here are corrupted, please help us with the resources, even if it’s just the blueprints, we can’t use the course without the blueprints…for your efforts not to be a waste. please help us re-upload the resources…please sir, please sir
Thank you for all you do
Can’t find the blueprints
I have the project files for those who need it.
Many have written comments regarding the course file not being available and till now no one from the admins even cared to upload the exercise files if someone wants to do something please do it well .. please upload the project fill
You need to upload the course file for following this course