


Realistic 3D Clothing by Tomas Sackmann

Release date:2022, May
Author:Tomas Sackmann
Skill level:Beginner
Language:English
Exercise files:Yes
Course Description
In this online course, the viewer will learn how to create realistic torned clothing ready for production using Marvelous Designer, Zbrush, Maya and Substance Painter. We will go through the Marvelous Designer user interface and its main features. Using as an example our character from the previous courses we will create his clothing, we will retopology, sculpt on them and texture them to get them ready to be animated. We will do all the clothing simulation in Marvelous Designer, the sculpting in Zbrush, retopology and UVs in Maya and the texturing in Substance 3D Painter.
This course has been designed for beginner and intermediate students with a passion for realism, garments and 3D characters in general.
This is the 4th of a series of tutorials where we will create a full 3D character ready for production. For this course, you will need to have a basic previous knowledge of Marvelous, Zbrush, Maya and Substance 3D Painter as in this course we don’t teach the software itself but the fundamentals of the creation of a character and the full workflow to make it ready for production.
Key takeaways:
- Understanding of the key elements of Marvelous User interface.
- Ability to create 3D garments
- Ability to create an animatable topology ready for production
- Ability to create good sets of UVs
- Ability to create primary, secondary and tertiary clothing details.
- Understanding of a texturing process for clothing using procedural and more artistic approaches in Substance 3D Painter, but with techniques that can be applied also in Mari or other texturing software.
- Understanding of the entire workflow of garment creation, not limited to softwares used in the course.
After viewing this course, people can expect to be able to create 3D clothing using the same workflow used for film, TV production, games and the metaverse. This is a key element in the process of getting a job as a Character Artist in the industry or just to make successful 3D character art pieces.
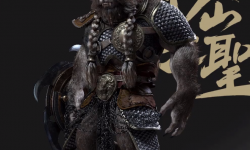
I am a designer, 3D Character and asset artist from Argentina working as a Modeler in Digital Domain 3.0. I love to work on realistic characters and I try to push my limits in each piece. Two of my main personal projects were the “Bedouin Elf ” and ‘’Alejandro – Gaucho Argentino’’. With the Bedouin Elf, I was lucky enough to get it selected on the Zbrush Summit 2020 Highlights and that gave me a lot of exposure. Thanks to this project I was invited to collaborate with Adobe Substance 3D Painter to create ‘’Alejandro’’ for the Substance 3D Magazine.
I am excited about sharing my workflow with you and helping you to get the first steps in this amazing world of character creation.
02 Pants in Marvlous
01 Setting up Scene
02 Trace Pattern And Sweing
03 Adjusting Pattern
04 Measrument Tool
05 Free Sewing
06 Test Materials
07 Strain Map
08 Improving Fit
09 Iternal Lines
10 Poligon Tool
11 Fold Angle
12 Merge Pattern
13 Stitching
14 More Sewing
15 More Sewing 2
03 Fabric Belts in Marvlous
16 Base Pattern
17 Leather Belt BlockOut
18 Morph Target
19 Adjusting Belt
20 Hanging Fabric Pattern
21 Torn Fabric
22 Iternal Line
04 UVs And Retopo in Marvlouse
23 UVes in Marvlous
24 Exporting Meshes
25 Intro To Retopology in Marvelous
26 Add Divisions
27 Pants Retopo Timelaps
28 Fabric Belt Retopo Timelaps
29 Exporting Retopo
05 Retopology Maya
30 Zremesher Zbrush
31 Orginaizing Maya File
32 Transfer UVs
33 Transfer Vertex Postion
34 Fix Flat Topology
35 Merge Patterns Timlaps
36 Recap
06 Seams And Thikness
37 Horizental Seams Part 1
38 Horizental Seams Part 2
39 Vertical Seams Part 1
40 Vertical Seams Part 2
41 Seams Timelaps
42 Thikness
43 Extrude Edges
44 Upper Thikness
45 Final Adjusment
07 UVs in Maya
46 Merging Thikness UVs
47 Timelaps
48 Testing UVs
49 UDIMs
50 Exporting Files
08 Zbrush
51 Importing Files
52 Introduction to Sculpting Folds
53 Types of Folds
54 Lower Folds
55 Layers
56 TimeLaps
57 Surface Noise
58 Sculpting Fabric Belt
59 Exporting Meshes
60 Fixing UVs
09 Substance 3D Preparing File And Baking
61 Setting up Mesh in Maya
62 Baking Substance
63 Fixing Baking Error
10 Material Blockout
64 Substance 3d Assets
65 Importing And Adjusting Material Part 1
66 Importing And Adjusting Material Part 2
67 Importing Body Base Color
11 Pants Texturing
68 Spots Height
69 Strips
70 Color Variation
71 References
72 Timelaps
73 Masking by UVs
74 Dirt
12 Opacity And Stitches
75 Opacity
76 Strains Timelaps
77 Introduction To Stitches
78 Add Stitches Manually
79 Stitches Timelaps
80 Fixing Stitches
13 Fabric Belt
81 Directionality
82 Fabric Material
83 Pattern in Photoshop part 1
84 Pattern in Photoshop part 2
85 Pattern in Photoshop part 3
86 Apply Pattern Substance
87 Color Variation
88 Dirt
14 Exporting And Bonus Lessons
89 Exporting Textures
90 Bonus Lesson
91 Bonus Timelaps
92 Conclusion
CGCircuit – Realistic 3D Clothing – Exercise Files.7z.001
CGCircuit – Realistic 3D Clothing – Exercise Files.7z.002
CGCircuit – Realistic 3D Clothing – Exercise Files.7z.003
CGCircuit – Realistic 3D Clothing – Exercise Files.7z.004
CGCircuit – Realistic 3D Clothing – Exercise Files.7z.005
CGCircuit – Realistic 3D Clothing – Exercise Files.7z.006
CGCircuit – Realistic 3D Clothing – Exercise Files.7z.007
CGCircuit – Realistic 3D Clothing – Exercise Files.7z.008
CGCircuit – Realistic 3D Clothing – Exercise Files.7z.009
[CGCircuit] Realistic 3D Clothing_Subtitles.7z


Hi, sound quality is really messed up, don’t if it’s in the original tutorial too, thanks anyways
can you add the character course