Ad Clicks : Ad Views : Ad Clicks : Ad Views : Ad Clicks : Ad Views : Ad Clicks : Ad Views :
Oh Snap!

It looks like you're using an adblocker. Adblockers make us sad. We use ads to keep our content happy and free. If you like what we are doing please consider supporting us by whitelisting our website. You can report badly-behaved ads by clicking/tapping the nearby 'Advertisement' X text.

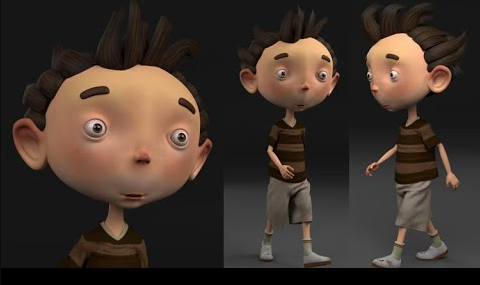
Complete Character Creation in Maya for Beginners by Nalini Kanta Jena

Release date:2020, April 8

Author:Nalini Kanta Jena

Skill level:Beginner

Language:English

Exercise files:Yes

I will start the course with Maya basics in case you have never used Maya before. Then I will model the character in Maya. After that I will unwrap UVs in Maya and then I will Switch to Substance painter and texture the character there. Then I will export textures into Maya and setup Lights, material and texture there. Then I will rig the character and then I will animate the character and create a walk cycle. After that I will work on the cloth so I will use ncloth for both the cloth and the hair simulation. at the end we are gonna render the animation sequence using Arnold.

Course Goal : At the end of this course, you will be able to Model, Texture, Rig, Animate, Simulate Cloth and Hair and Render Cartoon characters using Maya and Substance Painter.

Key Topics : In this course, you will be learning:

  • Character Modeling in Maya
  • UV Unwrapping in Maya
  • Texturing in Substance Painter
  • Rigging
  • Walk Cycle Animation
  • Creating Cloth and Hair Using ncloth
  • Rendering Animation
Watch online or Download for Free

01. Introduction
001 – Introduction
002 – What are in project files folder

02. Maya Basics
003 – User inteface overview
004 – Viewpot navigation
005 – Creating objects
006 – Saving and opening files
007 – Selecting objects and components
008 – Using move rotate and scale tool
009 – Using layers
010 – Soft selection and symmetry
011 – Hide and show objects
012 – Intro to outliner
013 – Using pivot point
014 – Group objects
015 – Using marking menu
016 – Using hotbox and wrap up

03. Character modeling in Maya
017 – Creating a project folder
018 – Reference image setup in maya
019 – Block out the torso
020 – Block out the arm
021 – Block out the leg
022 – Block out the hand
023 – Define the hand
024 – Block out the face eye topology
025 – Block out the face mouth topology
026 – Block out the face head topology
027 – Modeling the ear
028 – Modeling the nose
029 – Modeling mouth bag
030 – Adjusting the head with even polygons
031 – Conecting the head with body
032 – Modeling gum part001
033 – Modeling gum part002
034 – Modeling teeth
035 – Modeling tounge
036 – Blocking the foot
037 – Defining the lip
038 – Defining the nose
039 – Defining the eye
040 – Defining the head
041 – Defining the body
042 – Correcting the pose for rigging
043 – Mirroring the character
044 – Mirroring the eye
045 – Modeling the t-shirt
046 – Modeling the pant
047 – Blocking the shoe
048 – Creating curves for hair part001
049 – Creating curves for hair part002
050 – Creating curves for hair part003
051 – Generating geometry from curves part001
052 – Generating geometry from curves part002
053 – Adjusting hair clumps
054 – Converting hair into polygons
055 – Making the eyebrows
056 – Creating the hair filler
057 – Final check

04. UV Unwrapping in Maya
059 – Uv unwrapping basics
060 – Unwrapping shirt Uvs
061 – Unwrapping pant Uvs
062 – Unwrapping the head Uvs
063 – Unwrapping the torso Uvs
064 – Unwrapping the hand Uvs
065 – Unwrapping the leg Uvs
066 – Unwrapping the eye Uvs
067 – Unwrapping the hair Uvs
068 – Unwrapping mouth Uvs
069 – Packing Uvs for the cloth texture
070 – Packing Uvs for the body texture
071 – Packing Uvs for the mouth texture
072 – Packing Uvs for the eye texture
073 – Packing Uvs for the hair texture
074 – Clean up and exporting the model

05. Character Texturing in Substance Painter
075 – Creating a project
076 – Interface overview
077 – Navigating viewport
078 – Adding base skin-color
079 – Adding base color
080 – Adding base skin color
081 – Adding skin flaws
082 – Eye texturing
083 – T shirt texturing
084 – Pant texturing
085 – Socks texturing
086 – Shoe texturing
087 – Adding dirt to the shoes
088 – Mouth texturing
089 – Hair texture painting
090 – Hair alpha painting
091 – Final touch on texturing
092 – Rendering in substance painter
093 – Exporting textures from substance painter
094 – Import and assign textures in maya
095 – Rendering setup using arnold

06. Character Rigging in Maya
096 – Organising the scene for rigging
097 – Creating leg joints
098 – Mirroring leg joints
099 – Creating spine joints
100 – Creating the head joints
101 – Creating arm joints
102 – Binding skin with the joints
103 – Fixing skin deformation on leg
104 – Fixing skin deformation on hand
105 – Fixing skin deformation on head
106 – Creating global control
107 – Creating torso controls
108 – Fixing torso skin deformation
109 – Creating head controls
110 – Creating eye controls
111 – Creating clavicle and wrist controls
112 – Elbow and knee control
113 – Creating foot Ik groups
114 – Creating the foot control with costum attributes
115 – Creating foot roll and toe roll
116 – Creating finger costume attributes
117 – Creating an eye close blendshape
118 – Creating-a smile blendshape
119 – Creating a surprise blendshape
120 – Connecting control curves with blendshapes
121 – Final tweak to all the controlers

07. Character Animation in Maya
122 – Animation basics
123 – Correcting the rig for animation
124 – Creating the contact pose
125 – Creating the middle contact pose
126 – Creating the down pose
127 – Creating the passing pose
128 – Creating the peak point pose
129 – Fine tuning the animation using graph editor
130 – Making the animation cycle

08. Cloth adn Hair Simulation
131 – Making a highpoly version of the pant
132 – Making the low poly pant a ncloth
133 – Transforing the ncloth simulation to the high poly
134 – Making a highpoly version of the Tshirt
135 – Making the low poly shirt a ncloth
136 – Transforing the ncloth simulation to the high poly
137 – Simulating hair with ncloth part01
138 – Simulating hair with ncloth par-02
139 – Transforing hair simulation to high poly
140 – Creating a clean scene with cache data

09. Rendering
141 – Setting up a backdrop and camera
142 – Adjusting render settings to get good quality
143 – Rendering sequence images

10. Conclusion
144 – Conclusion


Join us on
  Channel    and      Group

  • Facebook
  • Twitter
  • Google+
  • Linkedin
  • Pinterest

7 Comments

Leave a Comment

Your email address will not be published. Required fields are marked *