Ad Clicks : Ad Views : Ad Clicks : Ad Views : Ad Clicks : Ad Views : Ad Clicks : Ad Views :
Oh Snap!

It looks like you're using an adblocker. Adblockers make us sad. We use ads to keep our content happy and free. If you like what we are doing please consider supporting us by whitelisting our website. You can report badly-behaved ads by clicking/tapping the nearby 'Advertisement' X text.

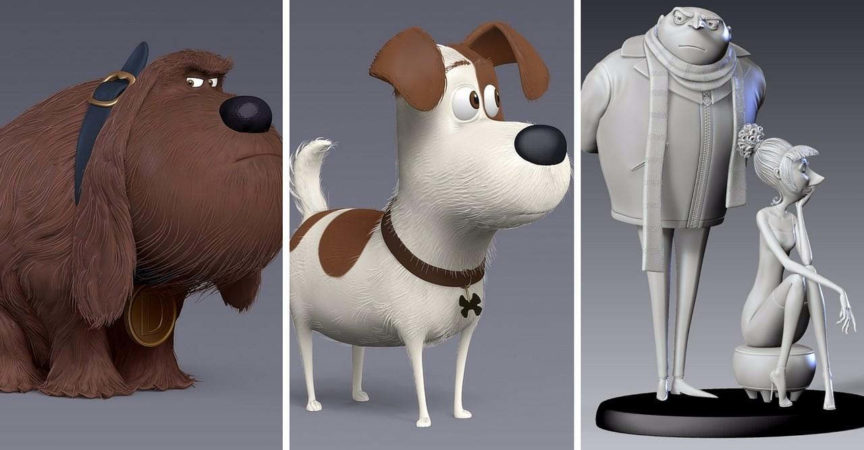
Stylized Character Development

/

Release date:2018

Author:Mike Defeo

Skill level:Beginner

Language:English

Exercise files:Yes

Something for the weekend, enjoy. Massive thanks to the donar.
Developing stylized characters for animation is not as easy as you might think, and infusing those characters with
timeless appeal is even harder. In this 10-week long course, Michael Defeo will show you the techniques and design
principles that have helped industry giants, like Blue Sky Studios and Illumination Entertainment, bring their most
memorable characters to life.

The 5 most important lessons:
How to understand and break down 3D forms and volumes
How to sculpt a stylized character for animation using key design principles
How to understand the concept of appeal and put it into practice as you design your own characters
Understanding the challenges professional character artists face and the role they play in animation pipelines
Tips for incorporating a character’s movement and facial expressions into your designs

Curriculum
Project 1 : Creating a Concept and Begining a Block Out
Use whatever program you’d like to generate a concept image for your sculpt.

Project 2 : Finishing the Block Out
Continue working on your character block out.

Project 3 : Creating the Head
Sculpt your character’s head.

Project 4 : Sculpting the Hair
Sculpting the major hair forms.

Project 5 : Adding More Detail to the Hair
Adding individual strands and adding variation to the hair.

Project 6 : Sculpting the Dog Head
Sculpt your character’s companion’s head.

Project 7 : Creating the Dog Body
Create your character’s companion’s body .

Project 8 : Sculpting Clothing
Sculpt basic wrinkles and add other clothing details.

Project 9 : Posing the Final Sculpt
Finish up your sculpt and pose it.

Project 10 : Prepping for 3D Print
Prep your model for 3D printing.

Watch online or Download for Free

Lessons A
01.Stylized Character Development – UArtsy
02.Stylized Character Development – UArtsy
03.Stylized Character Development – UArtsy
04.Stylized Character Development – UArtsy
05.Stylized Character Development – UArtsy
06.Stylized Character Development – UArtsy
07.Stylized Character Development – UArtsy
08.Stylized Character Development – UArtsy
09.Stylized Character Development – UArtsy
10.Stylized Character Development – UArtsy
11.Stylized Character Development – UArtsy

Lessons B
01.Stylized Character Development – UArtsy
02.Stylized Character Development – UArtsy
03.Stylized Character Development – UArtsy
04.Stylized Character Development – UArtsy
05.Stylized Character Development – UArtsy
06.Stylized Character Development – UArtsy
07.Stylized Character Development – UArtsy
08.Stylized Character Development – UArtsy
09.Stylized Character Development – UArtsy
10.Stylized Character Development – UArtsy
11.Stylized Character Development – UArtsy
12.Stylized Character Development – UArtsy

Project 01 Creating a Concept and Begining a Block Out
01
02
03.Marrying Anatomy and Appeal
04.Benefits of Teamwork in Productio
05.Using Simple Forms to Establish Volum
06.Improving the Appeal of an Existing Model
07.Introducing Our Project
08.Creating a Neutral Concept
09.Shoe and Arm
10.A Discussion of Anatomy
11.Mirroring
12.Class Resources.7z
13.Meet and Greet Part 1
14.Meet and Greet Part 2

Project 02 Finishing the Block Out
01.Finger Blockout
02.Duplicating the Fingers
03.Creating the Thumb and Placing the Hand
04.Wrist and Elbow
05.Cleaning Up the Leg
06.Cleaning Up the Torso
07.Dynameshing and ZRemeshing the Character

Project 03 Creating the Head
01.Mod 3 Resources.7z
02.Head Sculpting Technique Part 1
03.Head Sculpting Technique Part 2
04.Creating the Head and Teeth
05.Sculpting the Teeth and Refining the Mouth
06.Tweaking the Mouth, Eyes, and Brow
07.More Facial Adjustments
08.Continuing to Paint Face and Eyes
09.Fixing Symmetry
10.Creating Eyelashes

Project 04 Sculpting the Hair
01.Adjusting the Face
02.Adjusting the Ears
03.Sculpting the Eyebrows
04.Creating a Base for the Hair
05.Creating a Base for the Ponytail
06.Adjusting the Head and Hair
07.Sculpting the Bangs
08.Sculpting the Ponytail
09.Adding High Frequency Details to the Hair
10.Refining the Bangs

Project 05 Adding More Detail to the Hair
01.Utilizing Curve Brushes For Hair
02.Creating Variance In the Hair
03.Adding Curve Detail to the Ponytail
04.Final Touches on the Hair
05.Fiber Mesh Run Through
06.Redoing the Eyebrows
07.Adjusting the Eyes, Lips, Boots, and Gloves
08.More Adjustments, UVs and Surface Noise

Project 06 Sculpting the Dog Head
01.Surface Noise and Sculpting the Dog Head Part 1
02.Sculpting the Dog Head Part 2
03.Defning Hair Flow
04.Creating Specific Hair Shapes
05.Making and Utilizing a Fur Brush
06.Adding Individual Hairs
07.Hair Tufts Using Curve Tubes Snap

Project 07 Creating the Dog Body
01.Modifying the Dog Head and Poly Painting
02.Blocking Out the Dog Body
03.Detailing the Dog Suit
04.Refining the Dog Suit
05.Fnishing the Dog Suit and Detailing the Female Suit
06.Refining the Female Suit

Project 08 Sculpting Clothing
01.Drapery Overview
02.Basic Wrinkles
03.Sculpting Pants
04.Dress and Collar
05.Jacket with Collar
06.Cape Part 1
07.Cape Part 2

Project 09 Posing the Final Sculpt
01.Module 9 Resources
02.Sculpting the Boot
03.Refining Boots and Hands
04.Posing the Body
05.Posing the Neck and Resculpting Anatomical Landmarks
06.Tweaking the Pose
07.Adjusting the Legs and Lower Torso
08.Honeing in on the Final Look
09.Posing the Left Hand
10.Posing the Right Hand
11.Adding Straps and Tubes
12.Final Touches on the Dog
13.Final Adjustments to the Pose
14.Turntable Rendering

Project 10 Prepping for 3D Print
01.3D printing preparation and tips
02.Cutting the model parts for 3D printing
03.Preparing the helmet parts for printing
04.Preparing the head for printing
05.Preparing the torso for printing
06.Preparing other parts for 3d printing
07.Tweaks and final adjustments
08.Sending the model for printing
09.Cleaning Up and Assembling 3D prints


Join us on
  Channel    and      Group

  • Facebook
  • Twitter
  • Google+
  • Linkedin
  • Pinterest

4 Comments

  1. Hii Strawberry, This is really great. Please can you upload Follygon’s appeal academy

    From

    https://follygon.gumroad.com/l/psgkK

    Thanks very much

Leave a Comment

Your email address will not be published. Required fields are marked *