Ad Clicks : Ad Views : Ad Clicks : Ad Views : Ad Clicks : Ad Views : Ad Clicks : Ad Views :
Oh Snap!

It looks like you're using an adblocker. Adblockers make us sad. We use ads to keep our content happy and free. If you like what we are doing please consider supporting us by whitelisting our website. You can report badly-behaved ads by clicking/tapping the nearby 'Advertisement' X text.

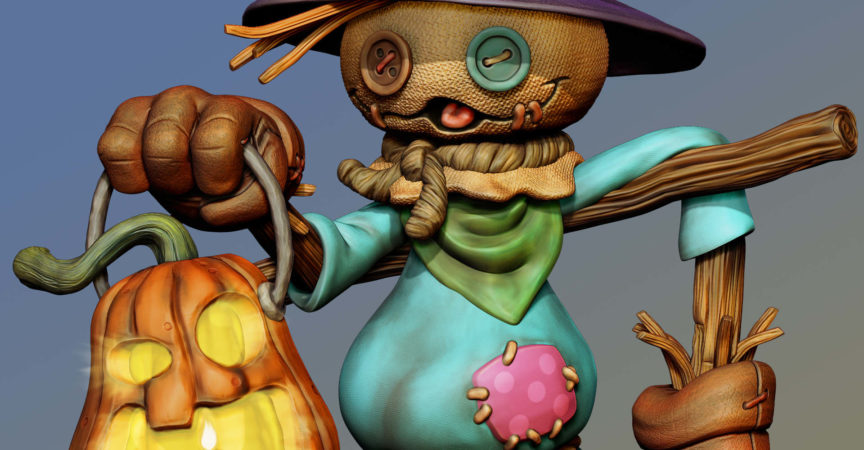
Sculpting a Scarecrow in ZBrush

/

Release date:2016, October 19

Duration:04 h 44 m

Author:Michael Ingrassia

Skill level:Intermediate

Language:English

Exercise files:Yes

Learn a variety of powerful digital sculpting techniques by creating a fun and whimsical Halloween scarecrow in ZBrush. Michael Ingrassia demonstrates techniques such as sculpting with DynaMesh, detailing a burlap hat with stitches, creating draping cloth folds, and “carving” pumpkins effortlessly. Students experienced in ZBrush will find this course refreshing and fun, and students new to ZBrush will be surprised at the professional look their design will achieve at the end of the lessons.
Topics include:
Creating base meshes
Using DynaMesh and ZRemesher
Creating a rope by drawing a curve with a custom brush
Sculpting buttons, a hat, and gloves
Texturing the scarecrow
Creating wood grain
Exporting subtools to Maya for adjustments
Rigging in Maya
Polypainting in ZBrush
Creating a final render in Photoshop

Table of Contents

Introduction
Welcome 1m
1. Getting Started
Setting up the course files 2m 38s
Setting up a custom Ul in ZBrush 4m 48s
2. Base Meshes
Creating base meshes in Maya 7m 10s
Importing base meshes into ZBrush 5m 21s
Creating base meshes from ZSpheres 4m 15s
Learning about DynaMesh and ZRemesher 5m 2s
Using DynaMesh and ZRemesher 6m 29s
Creating a rope by drawing a curve with a custom brush 5m 55s
Repairing rope with DynaMesh and ZRemesher 5m 56s
Adding new base meshes to Scene 1m 52s
3. Sculpting Details
Sculpting a button 8m 14s
Button holes and stitches 6m 38s
Sculpting the hat 8m
Hat band and patch 8m 38s
Hat stitches 5m 7s
Bending the hat and creating a crease 9m 24s
Texturing the hat 8m 6s
Sculpting and texturing the head 12m 36s
Handkerchief cloth folds 6m 39s
Glove sculpting 9m 39s
Glove leather texture 9m 43s
Glove seams and stitches 5m 56s
Sculpting details Into rope necklace 5m 14s
Finalizing details In rope necklace 6m 8s
Creating wood grain 5m 39s
Sculpting the branch 10m 34s
Sculpting the lantern handle 7m 46s
Carving a pumpkin 7m 22s
Adding details to the lantern 4m 27s
4. Review and Cleanup
Reviewing work and duplicate gloves and arms 7m 42s
Exporting subtools to Maya for adjustments 10m 16s
Building a simple rig in Maya 6m 38s
Repositioning the arms and hands 5m 46s
Repairing geometry and exporting from Maya 4m 1s
Importing repositioned components back to ZBrush 2m 14s
Assessing work In progress 4m 54s
Reposing a character 9m 1s
5. Final Polish, Polypaint, and Rendering
Restoring a low-poly mesh 5m 58s
Polypaint with the dark-to-light technique 6m 49s
Adding highlights to your model 3m 6s
Polishing your model with Polypaint 6m 24s
How to use render settings in ZBrush 6m 3s
Creating a final render in Photoshop 8m 45s
Conclusion
Final wrap-up 41s

Watch online or Download for Free

00. Introduction
01 – Welcome

01. Getting Started
02 – Setting up the course files
03 – Setting up a custom UI in ZBrush

02. Base Meshes
04 – Creating base meshes in Maya
05 – Importing base meshes into ZBrush
06 – Creating base meshes from ZSpheres
07 – Learning about DynaMesh and ZRemesher
08 – Using DynaMesh and ZRemesher
09 – Creating a rope by drawing a curve with a custom brush
10 – Repairing rope with DynaMesh and ZRemesher
11 – Adding new base meshes to Scene

03. Sculpting Details
12 – Sculpting a button
13 – Button holes and stitches
14 – Sculpting the hat
15 – Hat band and patch
16 – Hat stitches
17 – Bending the hat and creating a crease
18 – Texturing the hat
19 – Sculpting and texturing the head
20 – Handkerchief cloth folds
21 – Glove sculpting
22 – Glove leather texture
23 – Glove seams and stitches
24 – Sculpting details Into rope necklace
25 – Finalizing details In rope necklace
26 – Creating wood grain
27 – Sculpting the branch
28 – Sculpting the lantern handle
29 – Carving a pumpkin
30 – Adding details to the lantern

04. Review and Cleanup
31 – Reviewing work and duplicate gloves and arms
32 – Exporting subtools to Maya for adjustments
33 – Building a simple rig in Maya
34 – Repositioning the arms and hands
35 – Repairing geometry and exporting from Maya
36 – Importing repositioned components back to ZBrush
37 – Assessing work In progress
38 – Reposing a character

05. Final Polish, Polypaint, and Rendering
39 – Restoring a low-poly mesh
40 – Polypaint with the dark-to-light technique
41 – Adding highlights to your model
42 – Polishing your model with Polypaint
43 – How to use render settings in ZBrush
44 – Creating a final render in Photoshop
06. Conclusion
45 – Final wrap-up

CONTENT.md
Ex_Files_ZBrush_Scarecrow.7z
info.txt


Join us on
  Channel    and      Group

  • Facebook
  • Twitter
  • Google+
  • Linkedin
  • Pinterest

Leave a Comment

Your email address will not be published. Required fields are marked *