Drawing Eyes in Any Style you Like
Release date:2018
Author:Mitch
Skill level:Beginner
Language:English
Exercise files:Yes
Ready to learn how to draw an eye?
Using the techniques that you learn from drawing these eyes, you can then take the same process to create your own experiments of eyes and come up with a style all of your own, or use this knowledge to better understand how your favorite artist or characters have their eyes created.
How to Draw an Eye: Drawing Realistic Eyes
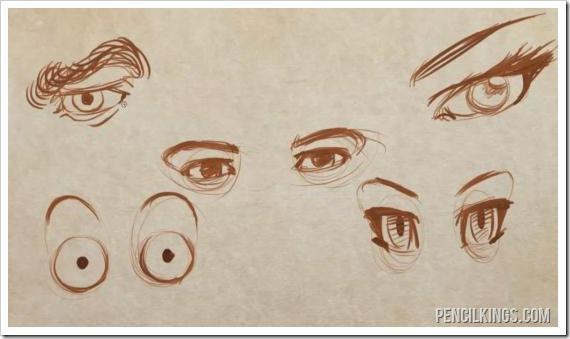
This is the style of eye that you’ve been learning how to draw throughout this entire lesson series on how to draw an eye. We’ll use this as a base to compare the other eye styles to.
Drawing Manga Style Eyes
By starting out with an eye socket that has been stretched vertically you can get a basic manga style.
The same basic principles still apply for creating the eye such as using four basic lines to get the shape of the eye, shading the upper eyelid, and establishing a rhythm between the eye brow and the outer corner of the eye.
The final result however is much different from the standard eye you’ve been drawing.
What do you think would happen if instead of stretching the eye vertically, you stretched it horizontally?
Drawing Simplified Cartoon Eyes
Start off this exploration by first drawing a circle to establish the eyeball. Then draw in your eye socket around the eye so that you’ll know where to place the eyebrow. The finished result is a simplified cartoon eye, minus the eyelids.
Working with the Pupil, Highlight and Eyelashes
Start off with a slightly stretched eye, and in this eye, try changing the highlight to be larger, and the pupil (the black hold in the middle of the eye) to be smaller. Finally really go wild with the eyelashes to make them longer and straighter than in the traditional realistic eye.
That’s it for this video drawing lesson series on how to draw an eye. We hope that you learned a lot here and that you now have the knowledge and confidence to go on to start drawing and experimenting with your own eye creations.
Please feel free to leave a comment below and let us know what you thought of this series and how it’s helped your drawing, and if you really liked this, then give us a like on Facebook or a Plus on Google + to help us spread the word to even more artists – thanks!


 Channel


Thank you so much for this. I’ve been waiting for the Pencilkings courses for a while.
You’re a rockstar!