Ad Clicks : Ad Views : Ad Clicks : Ad Views : Ad Clicks : Ad Views : Ad Clicks : Ad Views :
Oh Snap!

It looks like you're using an adblocker. Adblockers make us sad. We use ads to keep our content happy and free. If you like what we are doing please consider supporting us by whitelisting our website. You can report badly-behaved ads by clicking/tapping the nearby 'Advertisement' X text.

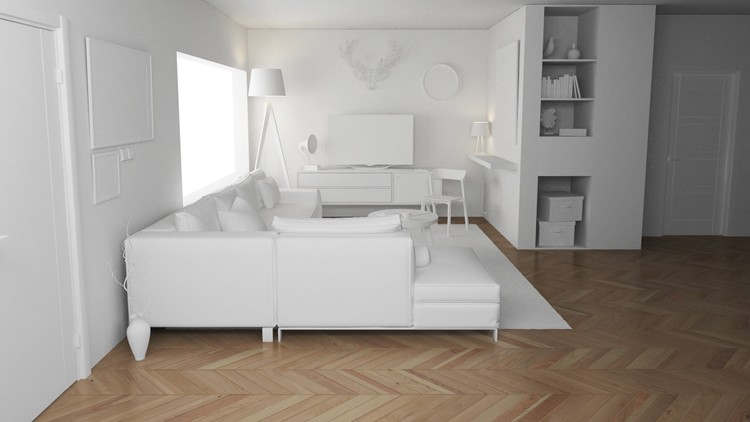
3DS Max, AutoCAD, Vray – Creating a Complete Interior Scene

/

Release date:2018, March

Duration:03 h 53 m

Author:Serkan Erkan

Skill level:Beginner

Language:English

Exercise files:Yes

What Will I Learn?
To set the first basic settings for AutoCAD
Drawing AutoCAD project from any indoor image
Editing the project with basic architectural standards
To set the first basic settings for 3D Studio Max
Exporting & Importing AutoCAD project to 3D Studio Max Environment
Modelling the main scene from AutoCAD project
Importing free 3D models and designing the scene
Adding artificial v-ray lights and v-ray settings (For test and final renderings)
Texturing & Material settings
Finalize the project for our client

Requirements
Please download AutoCAD, 3D Studio Max and the V-ray. Versions can be 2014 but it does not important at the first time. I will help you.

Description
JOIN OVER 2,500 + SUCCESSFUL STUDENTS WHO HAVE ALREADY TAKEN THIS COURSE!
The biggest update is coming for this course. I will create a new interior room, with new versions of V-Ray, 3DS Max and AutoCAD for 2019.
** Easter Celebration: I added some premium textures. You can find them under the “Lecture 19’s mat. tab” [25.03.2016] ** I added three “Wood Floor” textures with bump files. You can find them under the “Lecture19’s material tab” ** [13.02.2016] ** Materials and textures are up to date. ** [10.10.2015] ** The bonus lectures will be added soon. ** [20.09.2015] When you complete this training, you will be able to draw interior design plan with AutoCAD and you can model it on 3DS Max with very basic and practical methods in a few hours.
Then, we are going to design the scene we created by using free 3D models.
After doing the design process, we will set materials and textures. Then, we will look light settings and render customizations, we are going to have the final render with V-ray.

You can achieve significant gains with a simple plan by customers which can not catch revive in mind according toAutocad and 2D hand drawings. To see the Autocad project in 3D environment shall speed up your project. It can also help you to capture overlooked small details. I hope that you can reach a good level with this little course. I’m sure that how much you experience the best quality render you will get. I do this job fulltime at the office and get also freelance works.

I will also add some bonus features. You can see them when the training ends. Good luck!

Who is the target audience?
This course is meant for, who wants to make 3D visualization from an AutoCAD project, any image or hand drawing
No knowledge is needed. I’am showing every practical steps

Table of Contents

Introduction 01:00
Welcome 01:00
What You Need? 1p.
Installing Required Softwares 1p.

Introduction to AutoCAD 09:19
Workspace and Scaling Settings 03:33
Unit Settings and Osnap Tools 04:25
Layers 01:21

AutoCAD: Drawing a Simple Room From Any Image 14:42
Creating First Scene Part 1 05:36
Creating First Scene Part 2 09:06

Introduction to 3D Studio Max 05:11
Introduction to 3D Studio Max – Workspace and Scaling Settings 05:11

Export, Import, Free Models, Scene Design 01:08:31
Exporting Plan From AutoCAD – Importing Plan to 3D Studio Max Environment 01:08
Modelling Part 01 – Starting Interior Modelling 13:54
Modelling Part 02 – Importing Free 3D Models To Our Scene 15:47
Modelling Part 03 – Importing Free 3D Models To Our Scene 17:10
Modelling Part 04 – Importing Free 3D Models To Our Scene 20:32
V-Ray Lights, First V-Ray Settings and Test Rendering 38:31
The First Settings For V-Ray Render Engine 00:46
V-Ray Test Render Settings 10:03
Adding V-Ray Physical Camera 19:32
Adding V-Ray Artifical Lights and Test Rendering 08:10

Texturing and Material Settings 01:23:11
Texturing 01 – Texturing The Walls, Ceiling and Floor 15:40
Texturing 02 – Texturing Our Free Models (Doors and the window) 16:42
Texturing 03 – Texturing Our Free Models (Sofa) 15:19
Texturing 04 – Texturing Our Free Models (Chair and The Coffee Table) 05:41
Texturing 05 – Texturing Our Free Models (Buffet and The Shelf) 06:50
Texturing 06 – Texturing Our Free Models (Accessories) 18:00
Texturing 07 – Texturing Our Free Models (Accessories) & Taking a Test Render 04:59

Finalize The Project (Test renderings and The Final Render) 08:57
Finalize The Project: Final Render Settings and Final Rendering 08:57

Conclusion 02:11
Conclusion 01:24
Thank You! 00:47

Watch online or Download for Free

1. Introduction
1.01. Welcome

2. Introduction to AutoCAD
2.04. Workspace and Scaling Settings
2.05. Unit Settings and Osnap Tools
2.06. Layers

3. AutoCAD – Drawing a Simple Room From Any Image
3.07. Creating First Scene Part 1
3.08. Creating First Scene Part 2

4. Introduction to 3D Studio Max
4.09. Introduction to 3D Studio Max – Workspace and Scaling Settings

5. Export, Import, Free Models, Scene Design
5.10. Exporting Plan From AutoCAD – Importing Plan to 3D Studio Max Environment
5.11. Modelling Part 01 – Starting Interior Modelling
5.12. Modelling Part 02 – Importing Free 3D Models To Our Scene
5.13. Modelling Part 03 – Importing Free 3D Models To Our Scene
5.14. Modelling Part 04 – Importing Free 3D Models To Our Scene

6. V-Ray Lights, First V-Ray Settings and Test Rendering
6.15. The First Settings For V-Ray Render Engine
6.16. V-Ray Test Render Settings
6.17. Adding V-Ray Physical Camera
6.18. Adding V-Ray Artifical Lights and Test Rendering

7. Texturing and Material Settings
7.19. Texturing 01 – Texturing The Walls, Ceiling and Floor
7.20. Texturing 02 – Texturing Our Free Models (Doors and the window)
7.21. Texturing 03 – Texturing Our Free Models (Sofa)
7.22. Texturing 04 – Texturing Our Free Models (Chair and The Coffee Table)
7.23. Texturing 05 – Texturing Our Free Models (Buffet and The Shelf)
7.24. Texturing 06 – Texturing Our Free Models (Accessories)
7.25. Texturing 07 – Texturing Our Free Models (Accessories) & Taking a Test Render

8. Finalize The Project (Test renderings and The Final Render)
8.26. Finalize The Project (Test renderings and The Final Render)

9. Conclusion
9.27. Conclusion
9.28. Thank You!

Exercise_Files.7z


Join us on
  Channel    and      Group

  • Facebook
  • Twitter
  • Google+
  • Linkedin
  • Pinterest

2 Comments

Leave a Comment

Your email address will not be published. Required fields are marked *